How to Purge a Phishing Email from All Mailboxes
SOP #: | 017 |
| Prepared by: | Kwayne James |
Revision Date: | 9/11/2026 |
| Approved by: | Allwyn Griffith |
Purpose/Summary Statement:
Outlines the steps to locate a phishing or otherwise malicious email that has already been delivered to Milrose mailboxes, and to remove that email from every recipient's mailbox in a single tenant-wide action using Threat Explorer in the Microsoft Defender portal.
Scope
Milrose IT Infrastructure and Operations staff responding to a reported phishing, spoofing, or malware email that has reached one or more user mailboxes. This procedure removes mail from mailboxes across the tenant and is therefore restricted to staff holding the roles listed under Accounts / Access.
Definitions
- Soft delete — the message is moved to the Recoverable Items folder. It disappears from the user's view but can still be restored by IT or recovered by the user from Recover Deleted Items.
- Hard delete — the message is purged. It cannot be restored by the user, and recovery by IT is not possible unless the mailbox is on Litigation Hold or covered by a retention policy. Hard delete also removes the associated calendar event when the message is a meeting invite.
- Contains any of — an OR match. Every word entered is matched independently, so a three-word entry returns mail containing any one of those words.
Accounts / Access:
To perform the tasks in this SOP you will need an account holding the Security Administrator or Security Operator role, plus the Search and Purge role under Email & collaboration permissions in the Microsoft Defender portal. Read-only security roles can run the search but cannot submit the remediation.
Procedure:
1. Confirm the Threat Before Searching
- Obtain the reported message. Ask the reporting user to forward it as an attachment, or open it from the quarantine or the original report.
- Record the exact subject line, the sender address, and the date and time the message was received.
- Confirm the message is genuinely malicious before proceeding. A purge cannot be undone and will remove the message from every mailbox it matches.
- If the message is not clearly malicious, escalate to the IT Manager for a decision before continuing.
2. Build the Search in Threat Explorer
- Sign in to the Microsoft Defender portal at https://security.microsoft.com.
- Navigate to Email & collaboration → Explorer, then select the All email tab.
- Set the search filters as shown below.
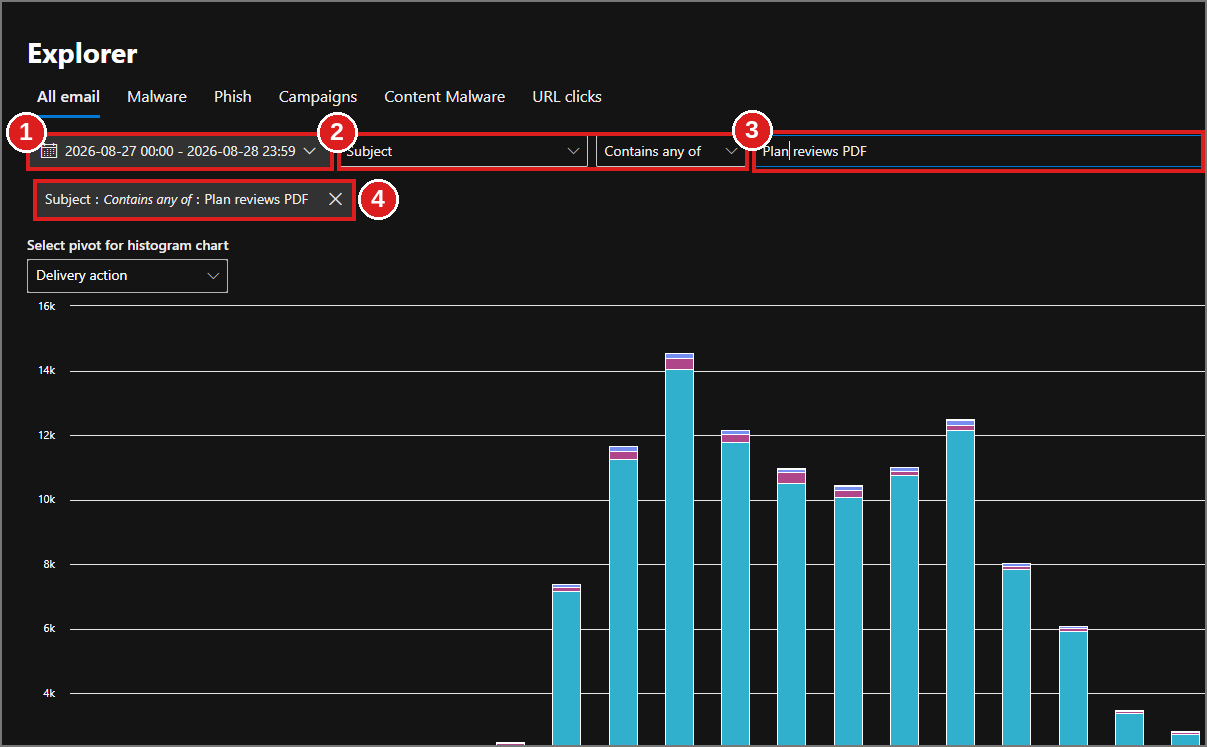
Figure 1 — Threat Explorer search filters.
- Date range — set the window to cover the delivery time recorded in Section 1. Widen it by a few hours on either side; do not widen it by days.
- Filter field — set to Subject. Change the operator to Equals any of so the whole subject line is matched as one string.
- Filter value — paste the exact subject line recorded in Section 1, then press Enter.
- Applied filter — confirm the filter chip below the search bar reflects what you intended, then run the search.
CAUTION — filter operator The Contains any of operator is an OR match. Entering three words returns every message whose subject contains any one of them, which will sweep in unrelated legitimate mail. Use Equals any of with the full subject line, and only fall back to Contains any of when the attacker randomised the subject. |
3. Verify the Result Set Before Selecting Anything
- Review the returned messages before taking any action. This step is mandatory and is the last point at which a bad search can be caught.
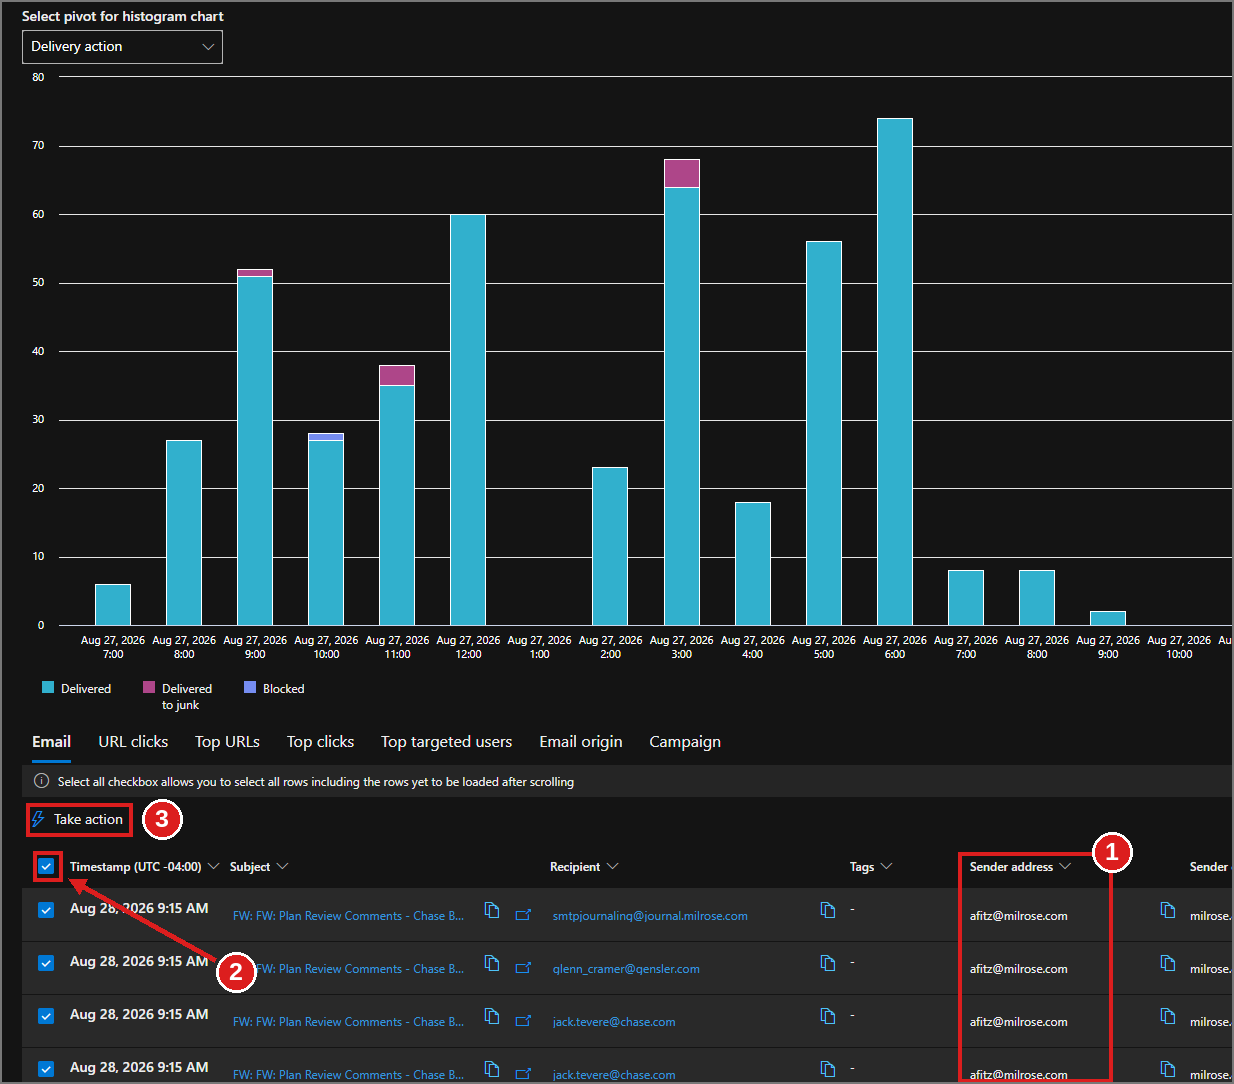
Figure 2 — Verifying and selecting the result set.
- Sender address — confirm every row shows the malicious sender recorded in Section 1. If legitimate senders appear in the list, stop and tighten the search.
- Check the result count against what you would expect from a single phishing send. A count far larger than the recipient count of one message usually means the filter is matching normal business mail.
- Scan the Recipient and Subject columns for anything that does not belong. Sort by Sender address to make outliers obvious.
- If anything in the result set looks wrong, return to Section 2 and refine the filters. Do not proceed on a result set you cannot account for.
4. Select the Messages and Start the Action
- Select the header checkbox (item 2 in Figure 2) to select all rows, including rows not yet loaded by scrolling. To act on a subset instead, tick the individual rows.
- Select Take action (item 3 in Figure 2) to open the wizard.
5. Choose the Response Action
- On the Choose response actions screen, tick Move or delete.
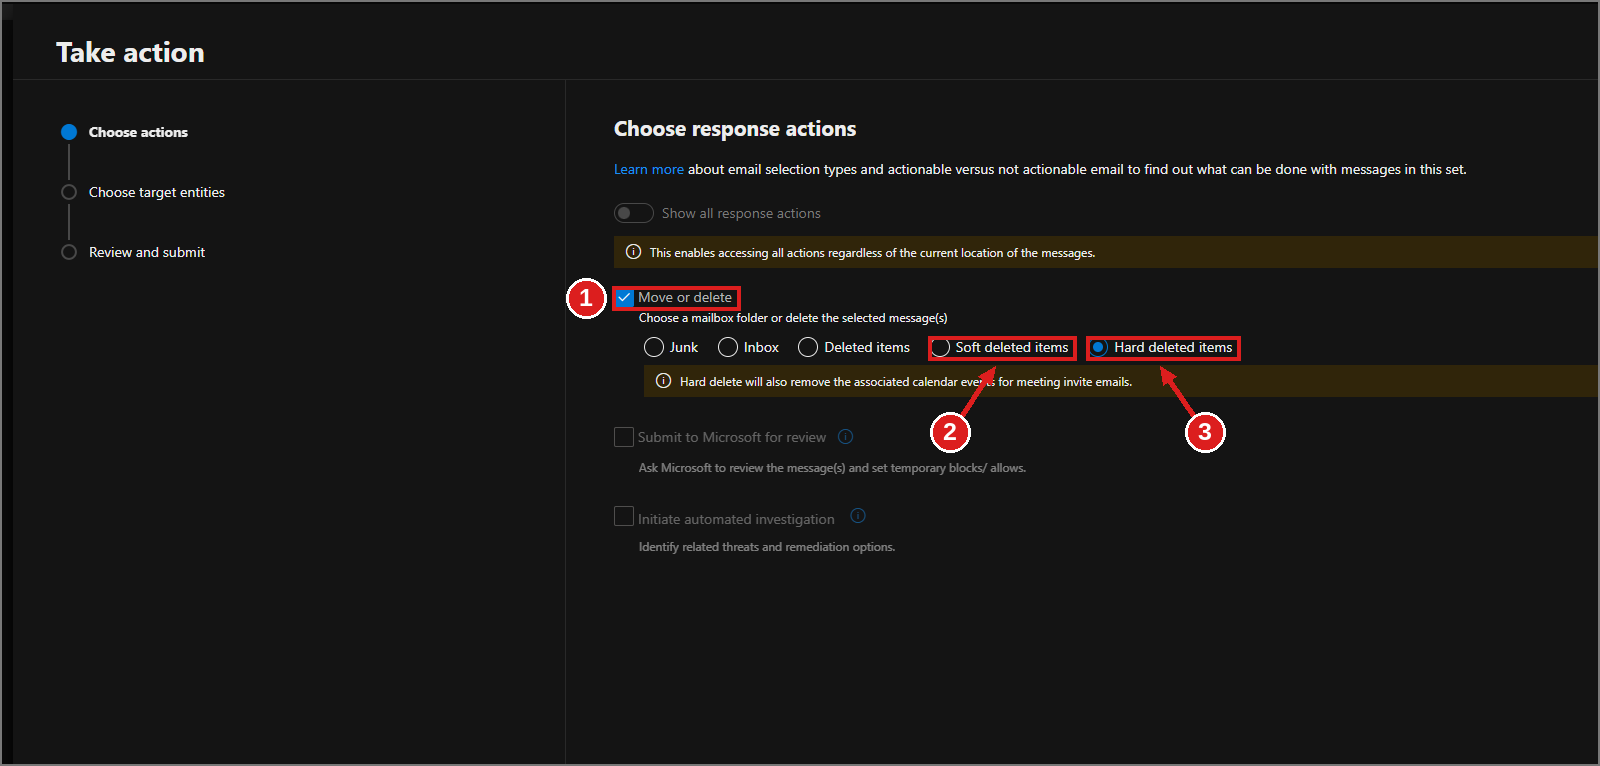
Figure 3 — Choosing the response action.
- Select Soft deleted items for the standard response. This removes the message from the user's view while leaving it recoverable if the search turns out to have been too broad.
- Select Hard deleted items only where the message is confirmed malicious and a permanent purge has been approved by the IT Manager. Record the approver in the description field in Section 6.
- Select Next.
CAUTION — hard delete is not reversible A hard delete purges the message from every targeted mailbox. Neither the user nor IT can restore it unless the mailbox is on Litigation Hold or covered by a retention policy. Default to soft delete first; escalate to hard delete only after the result set has been verified and the purge approved. |
6. Name the Remediation
- On the Choose target entities screen, enter a Name using the convention Phish-Purge-YYYYMMDD-<short subject>.
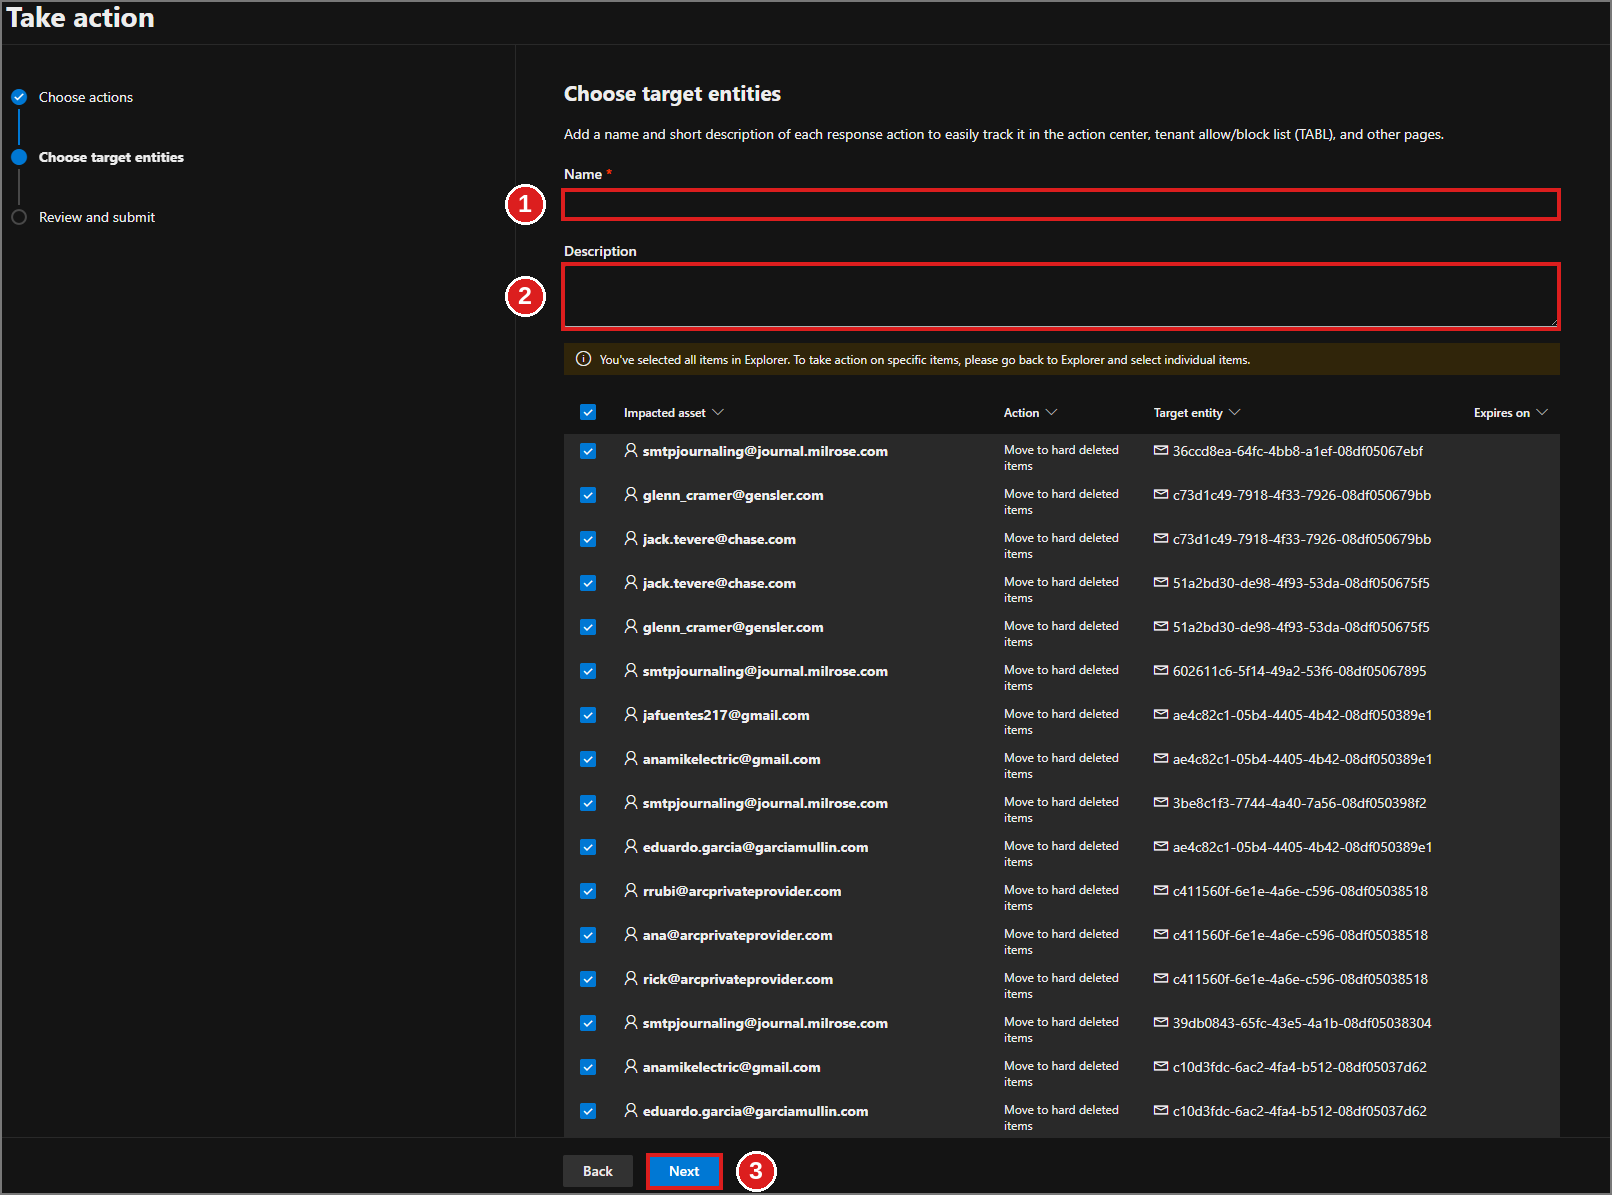
Figure 4 — Naming and describing the remediation.
- Enter a Description containing the ticket number, the sender address, who reported the message, and — for a hard delete — who approved it.
- Review the impacted assets listed on this screen, then select Next.
NOTE — naming matters later The name and description are what appear in the Action center and the tenant allow/block list. A remediation named “test” cannot be identified during an audit or a post-incident review. Do not submit an unnamed or placeholder-named action. |
7. Review and Submit
- On the Review and submit screen, confirm the message count matches the result set you verified in Section 3.
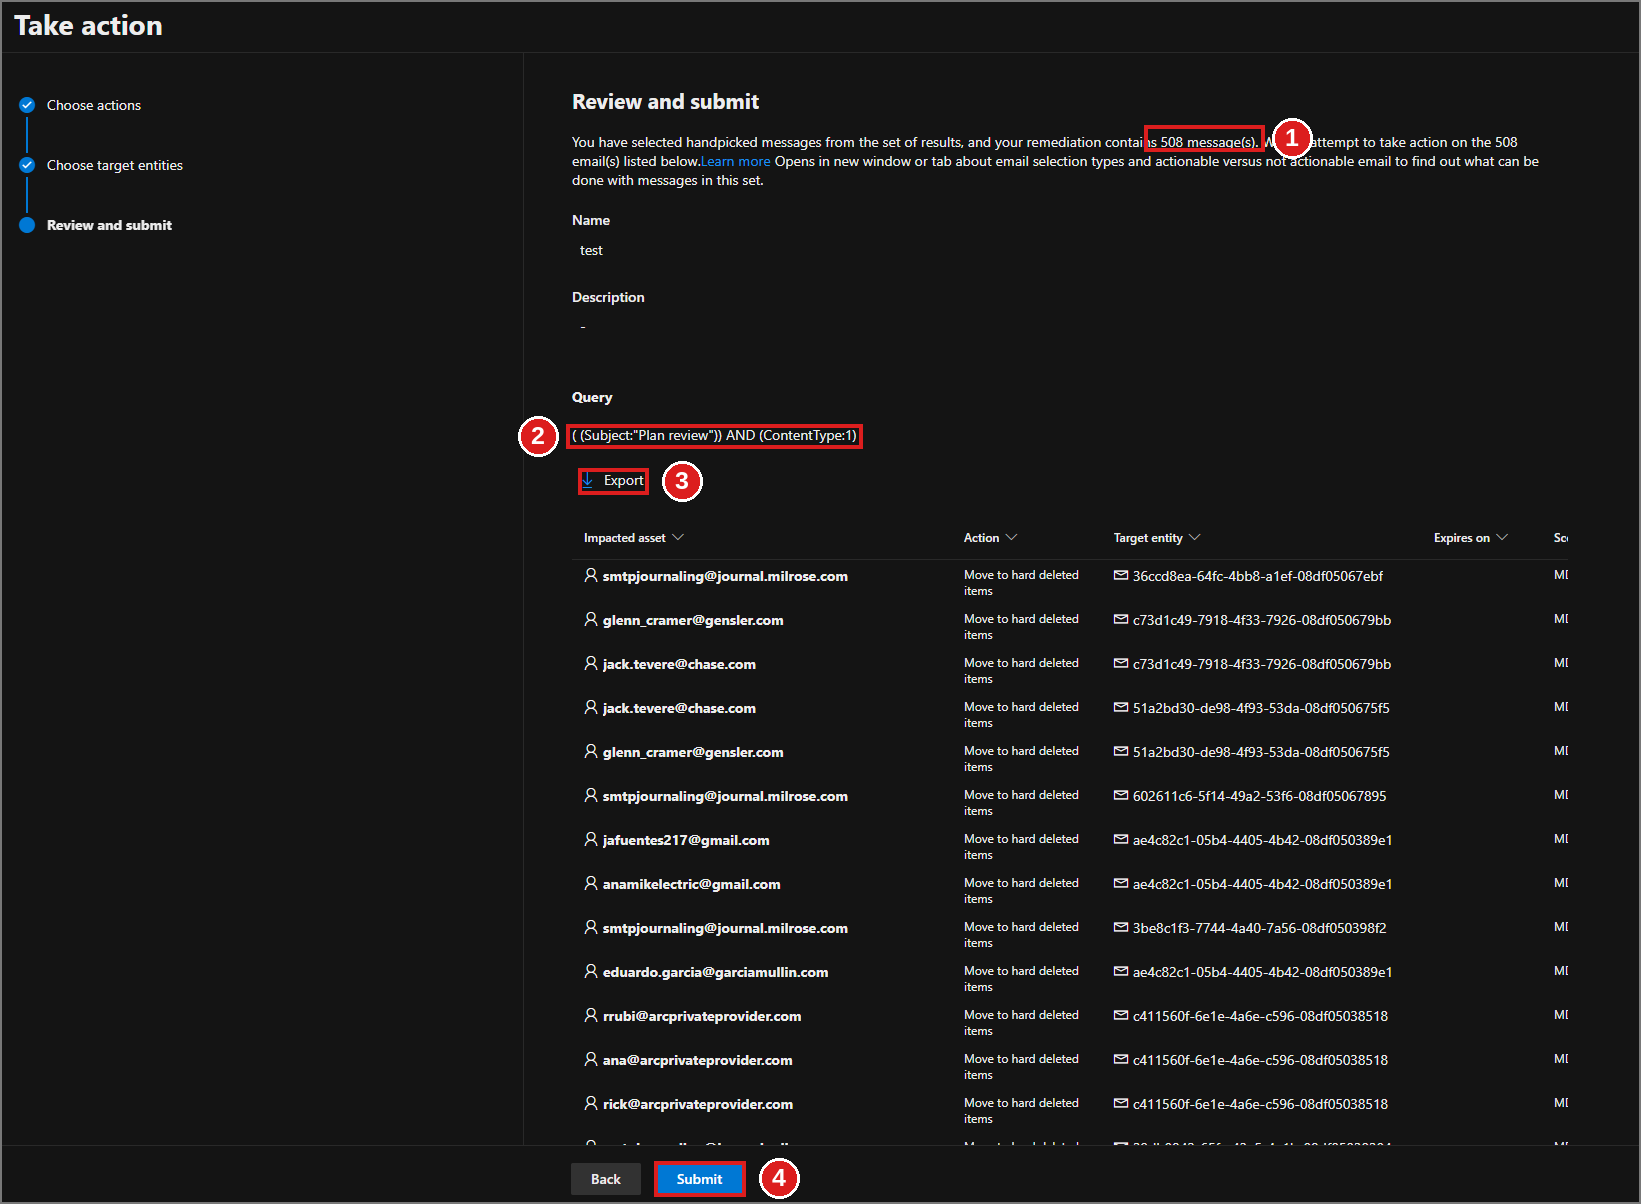
Figure 5 — Final review before submission.
- Confirm the Query shown is the query you intended to run.
- Select Export and save the CSV of impacted messages. Attach it to the incident ticket as the record of what was removed.
- Select Submit to run the remediation.
CAUTION — last checkpoint Submit is the point of no return for a hard delete. If the count, the query, or the sender does not match what you verified, select Back and correct the search. |
8. After Submission
- Open Actions & submissions → Action center → History and confirm the remediation completed. Note any messages reported as not remediated.
- Re-run the Section 2 search to confirm the messages no longer appear as delivered.
- Block the sender address or domain in the Tenant Allow/Block List if it is not already blocked.
- Update the incident ticket with the remediation name, the message count, the exported CSV, and the action taken (soft or hard delete).
- Notify the reporting user and, where the phish reached a large audience, send a short awareness notice to staff.
Revision History
Revision | Date | Author | Change |
1.0 | 8/28/2026 | Kwayne James | Initial release. |
Was this article helpful?
That’s Great!
Thank you for your feedback
Sorry! We couldn't be helpful
Thank you for your feedback
Feedback sent
We appreciate your effort and will try to fix the article